Beer Can Grilled Chicken
Beer Can Grilled Chicken is a bit of a misnomer really because it's cooked indirectly on the grill. It can also be smoked using wood chips soaked in the beer but I prefer to drink the beer...such a waste.
The basic principle is that you stand a chicken on a beer can (ie. the beer can goes into the cavity) that's been cut in half, filled with liquid and the liquid steams the chicken from the inside out.
The liquid can be the remains of the beer but I prefer to use wine with a few added ingredients such as garlic and onion. The world is your oyster so don't necessarily follow me, try what you want.
The basic principle is good because it's the bony cavity that you need to ensure is cooked through (and therefore safe to eat) so steaming the inside of the cavity can only help the process. Certainly a lot safer than stuffing the bird for added flavour which is only going to create a bigger mass to heat up and therefore more chance that the bird is cooked on the outside but under-cooked in the middle.
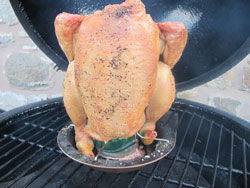
Standing a chicken on a beer can however is a pretty precarious business and somewhat hit and miss because to prepare a stable "upright" chicken you have to create a tripod using the beer can and the two chicken legs. It's really easy for the chicken legs to move (as they contract) during the cooking process and drop down the gaps in the grill which usually tips the contents of your beer can onto the coals.
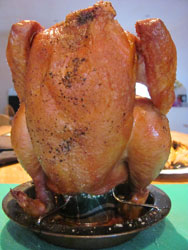
I prefer to use a vertical roaster and find a way to insert the beer can inside the roaster. It's a lot more stable doing it this way and you're guaranteed a result every time. In fact, better still are the vertical roasters that include central cylinder to replace the beer can, not only does this give stability to the chicken, you can fill the central cylinder with whatever you want and there's a drip tray to capture the juices.
For seasoning, you can use your favorite rub but I prefer the simple salt and pepper. We've got all that good flavoring going on inside the chicken why over do it?
Serves:- 4 people
Preparation Time:- 15 minutes
Cooking Time:- 75 minutes
Total Time:- 1 hour 30 minutes
Allergens
I've used wheat flour in the gravy which contains gluten. You can substitute cornflour (1 teaspoon) if you wish.
Ingredients:-
- 1 chicken (gutted)
- ½ beer can
- 2 cloves garlic, peeled and chopped
- 1 tablespoon chopped onion
- 1 glass white wine
- 1 tablespoon cooking oil
- Salt and pepper
For the gravy
- 1 tablespoon flour
- 1 glass white wine
- salt and pepper
Method:-
The first job is to prepare the contents of your beer can so because I'm not using beer I've opened the can and had a beer before starting!
Place the garlic, onion and white wine in the empty beer can and sit the chicken on top of it with the legs pointing down. Use the cooking oil to rub the chicken skin and then rub in the seasoning of your choice (salt and pepper in my case).
Place the chicken over indirect heat at approx 320°F or 160°C for 75 to 90 minutes or until the internal thigh temperature reaches 170°F or 75°C
Note:- You need to cook at over 150°C or 300°F to ensure that the Maillard reaction takes place and you get brown crispy skin. It's perfectly OK to cook for longer and more traditional "low and slow" temperatures (110°C or 225°F) and you'll still get supremely moist chicken but the skin will be chewy and not something you would want to eat.
Allow your beer can grilled chicken to stand for 15 minutes before serving so that the juices get sealed into the meat. If you've used a vertical chicken roaster with a drip tray then it's time to make the gravy.
Pour off the chicken juices from the drip tray into a small saucepan and sprinkle in the flour. Stir and cook until all the liquid has bee absorbed (you've formed a basic roux) and allow the flour to cook for a minute of so. Take the pan off the heat and slowly add the white wine whilst continuing to stir, once all the flour paste has dissolved, re-apply the heat to thicken the gravy. Season with salt and pepper and you're good to go.
Once you've done this beer can grilled chicken recipe once, you may never do chicken any other way. Thankfully however, there's a myriad of options available as to what to put in the beer can and what to rub on the skin so lack of variety is not going to be a problem.
If you prefer to follow the beer can grilled chicken video, then here it is...
See Also:-
How To Grill Chicken
Smoked Chicken
Kamado Roast Chicken
KFC Grilled Chicken
More Barbecue Chicken Recipes

Return to Recipes Home from Beer Can Grilled Chicken
