- Recipes Home
- Kamado Cooking
Kamado Cooking – The Complete Guide To The Ceramic BBQ
The complete guide to Kamado cooking. What to buy, how it works, set up tips and a stack of recipes so you can get the most out of your ceramic BBQ grill.

I’ve created this separate section for the kamado because it is unique in approach and the results are fantastic.
All my kamado cooking recipes are in the listings on the side nav bar but you can cut straight through to them, just click here.
The headline is always that you can use a kamado (ceramic BBQ) as both a grill and a smoker but really there’s more to it than that. Using it as a traditional oven gives wonderful results and with the high temperatures that you can achieve it also makes for a great pizza oven or a tandoor.

There are many brands of kamado, I've cooked on all the big named brands and you'll find my personal feelings about each right here:
I've also reviewed Grill Dome and some of the cheaper options on the market. To be honest, you get what you pay for and I've always found the cheaper versions to be lacking in one way or another but if you can't afford a big name then there are still some alternatives to consider. Click here for my budget kamado grill review page.
I’ve been kamado cooking 12 years and I have to say that the ceramic kamado grill is the most versatile piece of outdoor cooking equipment that I have ever experienced so if you’re interested in a kamado then I can’t recommend them more highly.
What Is A Kamado?
Humans have used clay vessels to cook their food for thousands of years. Archaeologists have found clay cooking pots in every part of the world, and some of the earliest found in China have been dated at over 3000 years old. It is believed that in these circular clay cooking vessels, the origins of the Kamado are to be found with the clay eventually being superseded by ceramic materials.
The basic cooking vessel has evolved in different parts of the world, in Japan the Mushikamado was used to steam rice by families for special ceremonial occasions.
The Mushikamado was again made of clay and found in Southern Japan, it consisted of a round and domed base with a similar shaped lid that lifted off the base. Innovations from the basic clay vessel included a damper and a draft door and this later version was fuelled by charcoal. A rice pot with a wooden lid would be suspended over the firebox and allowed to steam inside the Mushikamado.
It's the Mushikamado that has evolved into the modern day kamado and the distinguishing feature of a modern kamado is that it is manufactured from high performance ceramics. The ceramic shell acts as a "super insulant" which means that cooking temperatures can be easily maintained whatever the external weather conditions.
These insulation properties of the ceramic also mean that a little fire goes a long way so charcoal consumption is economic. Low and slow cooking can be done with just one fill of the charcoal basket or at the other extreme, the fire can deliver extra high temperatures making the perfect environment for baking bread and pizza.
What Makes Kamado Cooking So Good?
- First and foremost, the quality of the cooking. Even when experimenting with new recipes it's hard to really deliver anything other than a supremely succulent result.
- Safety - The surface doesn’t get as hot as a traditional barbecue and the fire is in a small area.
- The exterior is treated with a baked on glaze so these grills should last forever.
- The heat on the interior burns off any grease (the same principle as an Aga) and this works fine so long as you don't get too much tar from cooking low and slow.
- When baking you’ll get that “brick oven” flavour and crust to the food
Moisture retention is a key feature, the kamado cooking process is different to a conventional smoker and the manufacturers state that there’s actually no need for a water pan at all.
It's air flow that dries things out; think of hanging the washing out of the line on a windy day and it dries really quickly. I mentioned before that a little fire goes a long way and a small fire can be maintained with the minimum of air flow. It's this reduced air flow through the kamado that has to opposite effect to the windy day and so food remains supremely moist.
Note: There are times when I still choose to put a water pan in a kamado. Pulled pork is a case in point because the steam from the water pan helps create a sauna effect that brings the meat up to the preferred internal temperature a little quicker, humidity also helps with formation of a pink smoke ring and bark setting.
So the key benefits of kamado cooking are that food cooks quicker, remains moist, there’s no need for constant tending of the charcoal and a ceramic grill is remarkably economical on charcoal consumption. It's this that differentiates a ceramic kamado from other kettle style smokers.
The kamado manufacturers claim that a ceramic grill is ready to cook on in 10 minutes (marginally
optimistic) but certainly by 15 minutes I find that you can get up to the benchmark smoking
temperature of 225°F or 110°C. That said it pays to make sure that the whole ceramic shell has absorbed heat because this makes temperature control that much easier - see the temperature regulation section below
The Important Features
There are a lot of kamado brands on the market so choosing the right one for you needs some thought. Please read my reviews to help you make up your mind and this section will help you understand the key features that will help you get the most out of kamado cooking for many years to come.
Note: My own research led me to invest in Monolith for my back garden so you may find slightly more Monolith pictures in this guide than for other brands as I demonstrate the features and benefits that led me to my preferred choice.
Quality Ceramic
All ceramics are not the same and that applies both to the chemical content and the design mould. The bottom line is that you get what you pay for but there are a couple of features to look out for.
- Segmented firebox - this improvement to the firebox design minimises the possibility of cracks appearing during thermal expansion.
- Dimples / Craquelure - The external glaze on a ceramic grill has a different coefficient of expansion to the ceramic. The dimpled shell and craquelure (network of fine cracks in the glaze) should be designed in to prevent chipping or a crack to the ceramic. You can be forgiven for thinking it a manufacturing fault but it isn't.
Heat Deflector Stones
The heat deflector stones are critical to the verstility of kamado cooking. By inserting these stones you change the function from a direct heat grill to a convection style oven / smoker.
Some cheap kamado grills don't come with heat deflector stones so you're paying a good chunk of money and getting less than a quarter of the kamado cooking functionality.
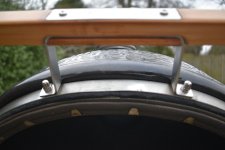
Some brands feature two "half moon" heat deflector stones which creates the capability for 2 zone cooking - direct heat on one side and indirect heat of the other. This is all hooked up with a half moon grill grate system too, Kamado Joe call it "Divide & Conquer", Monolith call it the "Pro Series Smart Grid System".
 Kamado Cooking Set Up - Charcoal basket with divider, half moon heat deflector stone & half moon grill grate with variable height setting.
Keep your heat deflector stones clean. You can do this by wrapping them in foil (Monolith also provide you with a protective drip tray) and this stops fatty deposits from one cook interfering with the flavour that you want to achieve in your next cook.
Variable Height Set Up
It's not just about direct and indirect heat zones. You can also vary the height of your cooking grates to create subtle differences in cooking temperature within the kamado. Closer to the fire will be hotter than further away (higher up in the kamado).
The Monolith "Smart Grid System" (pictured above) and Kamado Joe "Divide and Conquer" lead the way with these design innovations.
Warranty
A ceramic grill is a relatively expensive piece of kit but there are no parts to go wrong, they are weatherproof and so it should be a purchase for life. Many brands (Big Green Egg, Kamado Joe, Monolith) back up their manufacturing with a lifetime warranty. Others do not. Yes, you pay something for peace of mind and from how I've seen it in action, it's pretty much a "no questions asked" straight replacement should you have a problem and that counts for something in this day and age.
Note: The biggest opportunity for wear and tear is the gasket and manufacturers have different approaches to this part.
Felt gasket - it will need replacing every year or so (dependent on use) but is relatively cheap and easy to replace.
Glass mesh gasket - more robust than the felt gasket but the replacement cost is about five times that of a regular felt gasket.
In theory (and if you can afford it) the glass mesh option is definitely worth the money because it's so much more durable but, just because kamado features a mesh gasket, it doesn't mean that the manufacturer has used an equally robust adhesive and if the adhesive fails then it's only a matter of time before you'll need to replace.
 A glass mesh gasket is only as good as the adhesive that secures it
However Monolith have taken the game to another level with the Pro Series 2.0.
A best in class system that staples the glass mesh gasket to the lid and then seated the lid against a stainless steel plate on the base.
 Fibre Mesh Gasket Stapled To Lid
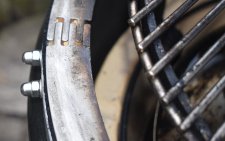 Stainless Steel Base Plate
The above system is now standard across the Pro Series 2.0 size range.
Accessories & Brand Support
Kamado BBQ grills come in different shapes and sizes so it's important to understand that many accessories are brand specific. The rotisserie is a classic example.

A kamado rotisserie is wedge shaped, thinner at the back and wider at the front so that you can close and cook with the lid closed.
It's not just the diameter and the shape, it's also about the angle of the wedge because different hinge mechanisms create different angles so you can't interchange between brands as you might think.
The images below show some of the different approaches that brand manufacturers take to hinge design.
 Pit Boss
 Big Green Egg
 Monolith
If you really want to exploit the full versatility of kamado cooking then consider what accessories you might want to buy in the future before choosing your kamado brand.
How To Light A Kamado
Kamado cooking is done over charcoal so the first thing to do is for fill your fire box with charcoal.
Getting the versatility and temperature stability out of your kamado is all about your ability to control air flow so to get the most of kamado cooking, here are the important things to remember.
Charcoal
Always use virgin hardwood lump charcoal. Cheap charcoal is made from softwood and won't burn at such a high temperature. Cheap charcoal is also made out of old furniture (varnish and all) which will taint the flavour of your food. Briquettes are made from charcoal dust which leaves a sediment as it burns and this can hinder air flow through the kamado.
All of the top kamado brands produce their own charcoal and given the premium price I used to think that this was a bit of a con...but it's not. The quality of the charcoal is without doubt superior and considering that kamado cooking is so economical on charcoal I think that it makes sense to use the manufacturers brands and pay that bit extra.
Look for FSC certification for sustainably sourced charcoal too.
Using A Charcoal Basket
Some manufacturers include a stainless steel charcoal basket with their standard kit. Others offer it as an option at extra cost. You can also buy them separately and are often referred to as kick-ash baskets.
A basket provides two benefits:
- It separates the charcoal from the sides of the ceramic firebox thus aiding air flow. Better air flow makes for more consistent temperature control and less time to reach the higher temperatures
- Many baskets also feature a divider which helps create 2 distinct cooking zones giving greater versatility to your kamado cooking
The basket is less important when cooking low and slow. In fact I prefer not to use a basket in this instance because it means that you can get more charcoal in the firebox and therefore cook for longer periods of time.
Note: Primo include a cast iron firebox divider in their larger ovals and this is a good alternative 2 zone solution.
Lighters, cubes and fluids
Any lighter fluid / cube that is petroleum based will taint the flavour of your food not just for this first cook but also for future cooks because the accelerants get absorbed into the ceramic.
Always use a non petroleum based firelighter. Place the firelighter in amongst the charcoal, light it, leave the kamado lid and the bottom vent open. When the firelighter has done it's job and has extinguished, close the kamado lid and fully open the top vent cap so that you get the maximum airflow. It's at this point that you need to keep an eye on the temperature gauge because it'll shoot up pretty quickly.
A cleaner method to light a kamado is to use an electric fire starter, it's like having a hair drier on steroids and best of all, they never run out of gas. To see how they work, watch this short video.
The best known brands are Monolighter (by Monolith) and Looftlighter, as
always there are cheaper products out there but I've only ever heard
bad things about them such as the perforated metal sheath melting. Stick with either one of the two that I have mentioned and you can't go far wrong.
Temperature Regulation
One of the major plusses to kamado cooking is that once the temperature is set, your kamado will sit at your desired temperature without continuous tending or adjustment to the air flow.

Having lit your kamado & with the top and bottom vents fully open, the temperature gauge will just keep on climbing 10 degrees every minute.
My general rules for the warm up phase:
- Temperature stability isn't just controlled by the intensity of the fire, it's also about the warmth of the ceramic so take time to ensure that the shell has time to absorb heat.
- Warm the kamado up while empty (no cooking parts) so that there is heat build up into the ceramic walls.
- Inserting the deflector stones / cooking grates will inhibit air flow so expect a temperature dip when you do this. Note that the greater the heat build up in the walls, the less dramatic the temperature drop.
There are different approaches to temperature regulation and exact settings will differ brand by brand but
here's my quick operating guide:
- Top and bottom vents full open and the temperature rockets
- When you reach your desired temperature, close off the bottom vent to about ½ inch to stabilise (a thumbnail if smoking low and slow).
- Use the bottom vent for large changes in temp but when in the “area” you need to be, use the top vent for fine tuning (+/- 25°)
- Only change the setting on the bottom or the top, never both at the same time
- If you have the small top vents open and close them half way, the temp will reduce by approx 10°C / 18°F
- A steady smoking temperature is approximated by the bottom vent open a quarter inch and the small daisy wheel vents half open.
- I grill with the bottom vent open an inch and the small daisy wheel vents fully open
If you simply want to set up for roasting, somewhere between 150 - 180°C (300 - 350°F) then a simple way is to fully open the bottom vent and just have a small hole open on the top vent. You can light up, close the lid and leave it in this set up for about 30 mins and you'll have well warmed through ceramic walls and you're ready to cook.
Cooling A Kamado
Occasionally you might want to start your kamado cooking on high temperature and then cool down to a lower temperature.
Some kamado "nay sayers" will tell you that it's impossible to reduce the temperature in a kamado and this is the biggest negative to kamado cooking. To be fair they have a point, although there is a simple solution.
The heat stored in the ceramic walls makes a kamado slow but not impossible to cool down mid way through a cook. The easy way to do it is to place a large pan of cold water on the grill grate, close the lid and close both top and bottom vents for 10-15 minutes.
The lack of air will damp down (but not extinguish) the fire and the pan of water will absorb heat from all parts of the kamado. Simple and effective.
How To Cook On A Kamado
Despite my insistance that a kamado is the most versatile piece of outdoor cooking equipment there are in essence two basic set ups for kamado cooking.
Direct Cooking
For grilling and searing. There's no barrier between the charcoal and the food.

Kamado cooking styles that use direct heat:
Grilling

160 - 180°C (320 - 360°F) - typically cooking one side, flipping and
cooking the other. You will however notice that a kamado does still have
an all round cook effect on food and isn't just one side or the other.
Searing

300°C (575°F) - As above, cooking one side, flipping and cooking the other but at a higher temperature which creates a crisp caramelised exterior to a steak or chop. You may choose to invest in a cast iron grill grate to get those all important sear marks too.
Other set ups where you might use direct heat include:
Wok Cooking

The wok stand is designed to direct the heat from your fire to the right part of the wok. Cook with the bottom vent half open and lid open.
Rotisserie

Bank the charcoal to one side when using the rotisserie. Make your fire out of half a dozen large lumps of charcoal and add an additional one every now and then. Close the lid and keep the temperature between 150 - 180°C (300 - 350°F)
Plancha Or Fire Plate Cooking

Large fire plates are hot near the centre and cooler to the outside. Great for communal cooking.
Fish Plank

With the bottom vent closed your kamado is like a fire pit. Cook with the lid open and a gentle fire.
Kamado Tandoori

300°C (575°F) - Skewers, flatbreads, hot and fast cooking that seals in the juices.
Indirect Cooking
The difference between dirst and indirect cooking in a kamado is the insertion of heat deflector stones between the charcoal heat source and the food thus transforming the kamado from a grill to a convention oven.

Note: Half moon deflector stones coupled with a charcoal basket divider with segrate your kamado providing 50% direct heat and 50% convection heat.
Kamado cooking using the indirect set up:
Smoking

110 - 125°C (225 - 260°F). Add wood chunks to your charcoal fire and cook meats at these low temperatures for long periods of time
Roasting
180 - 220°C (350 - 430°F). Ideal for large tender meat joints, beer can chicken and your Christmas turkey. Any traditional oven recipe is ideal for kamado cooking although it may cook a little quicker and be prepared for fantastic results.
Baking

140 - 200°C (285 - 390°F) Use the pizza stone over the heat deflector stones for pastries and breads. Depending on your cook you may want to start with a cold pizza stone.
Braising Or Dutch Oven Cooking

135 - 165°C (275 - 325°F). Leave a good air gap between the heat deflector stones and the grill grate upon which you place you pan.
Pizza

325 - 350°C (620 - 700°F). A ceramic kamado is ideal for cooking at these high temperatures and delivers fantastic pizza in just minutes. A good air gap between the heat deflector stones and the pizza stone is the best set up and give your pizza stone plenty of time to get up to temperature.
Plank Cooking
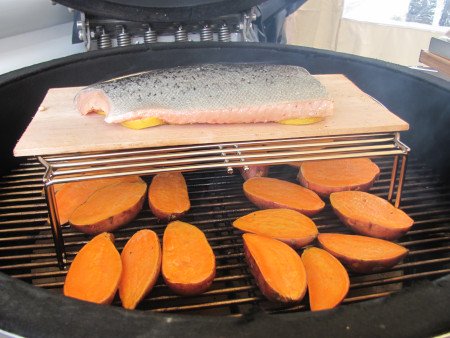
110 - 180°C (230 - 350°C). Fish cooked low at the lower end of the temperature scale with some wood chips on the coals for added flavour. But then this chicken stuffed with garlic, cheese and wrapped in bacon was amazing too!
Clean Down
To clean the exterior of a kamado, cart and side tables, use water and mild cleaning agent. Never use water to clean the inside of a kamado.
The interior can be cleaned by using high temperatures. Remove all stainless steel components before commencing.
- Completely open both top and bottom vents (make sure there is enough charcoal in the firebox).
- Raise the temperature to 400°C and leave for 10 minutes.
Be careful not to exceed 400 °C because this could damage the gasket.
After the the kamado has cooled down, remove any ash from the ceramic components with a soft brush and clean the grill grates with a wire brush.
Storage
You mean you're not kamado cooking all year round??? Well some of us do go on vacation now and then.
If you leave a barbecue outside for a long period of time without using it then inevitably you will get a build up of mould inside as moisture builds up in the grill.
Scrape away the mould or mildew with a spatula or grill brush, burn away the rest by raising the temperature to 400°C and leave for 10 minutes. The heat will burn off all the remaining mould & mildew residue.
Tip: If you plan not to cook for a longer period of time then you can minimise the mould build up by removing unused charcoal from your kamado as charcoal will draw even more moisture into your grill.
A cover will protect your grill from the elements. If you use one then make sure that the top and bottom vents remain open while the cover is on so that air can still flow.
My Favourite Ceramic Kamado Cooking Recipes
I've been kamado cooking now for over 12 years and like me, once you start you might never stop. I've developed these recipes over the years as and when I buy a new accessory for my ceramic grill so dig in!
Miso Marinated Mushrooms - A really simple and super delicious appetiser.
Deep Fried Mozzarella Balls - Cooked in my Monolith wok and stand.
Mini Lamb Koftas With Yoghurt Raita Dip - cooked on the plancha, just skewer them with a cocktail stick.
Cauliflower Pakora Florets With Pomegranate Raita - Subtly spiced Indian flavours. A vegetarian appetiser deep fried in my wok.
Vegan Mini Sausage Rolls - A tasty appetiser for any meal.
Sun Blush Tomato & Pesto Puff Pastry Bites - Another easy and tasty appetiser made in 30 minutes.
Traditional Roast Beef - Does what it says on the tin.
Barbecue Burgers - The kamado just keeps food so succulent and this recipe is testament to that.
Burger And Fries - Crank up the temperature and enjoy!
Traditional Roast Chicken - You can't beat it. Pure and simple.
Rotisserie Chicken and Mushroom - A layered kebab of juicy chicken thigh and meaty field mushrooms.
Chicken Tikka - Marinated boneless, skinless chicken thighs cooked in your very own kamado tandoor.
Hometown Kamado Style Ribs - Long and slow followed by a flash on the grill and covered in honey barbecue sauce - YUM!
Smoked Venison Roast - Infused with garlic, wrapped in bacon and roasted until pink.
Kamado BBQ Turkey - Simply the most succulent results for your Thanksgiving or Christmas meal.
Lamb Provencale - Leg of lamb rubbed with garlic and the herbs typical of Southern France. Make this your alternative Sunday roast.
Kamado Grilled Lamb Chops - Keeping it simple with the best meat, the best marinade and (of course) the best cooking.
Croissants - What better way to start the day with freshly brewed coffee?
Naan Bread - The only serious accompaniment to any tandoori dish and so easy to prepare.
Pitta Bread Recipe - Make these breads to serve with any kebabs.
Onions And Potatoes - A favorite of mine, baked in cream and perfect with a butterfly leg or shoulder of lamb.
Steak, The Kamado Way - Just seared to seal in the flavor.
Tandoori Chicken - 48 hours of marinading your chicken breast but well worth it for a traditional taste of India.
Toad In The Hole - Yes you really can extend your kamado cooking repertoire to include Yorkshire pudding.
Plancha Grilled Vegetables - served with pesto dressing and grilled flat breads.
Baby Hasselback Potato Sliders - I made these to accompany a main meal but they just disappeared as finger food.
Kamado Cauliflower Couscous With Roasted Veggies
Baked Camembert With Cranberry Sauce - A kamado classic to finish off a sumptuous Thanksgiving or Christmas meal.
Mince Pie Puffs - Another seasonal treat and ready in 30 minutes.
Sticky Toffee Pudding - Jon's award winning recipe
See Also:-
Monolith Kamado Grills
Primo Kamado
Grill Dome Kamado
Big Green Egg
Kamado Joe Grill
Budget Kamado Grill Review


Return to Home Page from Kamado Cooking – Ceramic BBQ Recipes
 Keep updated with my RSS feed


